Saturday, June 16, 2012

Being Crafty!

One of my resolutions this year was to be more creative, to actively work at creating things that could be both beautiful and functional. I've been knitting (slowly) and perusing DIY blogs (daily) and decided to take inspiration from a friend and create a jewelry display stand.

Materials: bamboo silverware divider; patterned paper from Paper Source; ruled cutting mat; adhesive spray; power drill; drill bits; hook and cup screws; eyelet screws.

I started this project shortly after New Years. Technically, I had begun it before by purchasing the silverware divider, but had done absolutely nothing with it. So we're going to mark that as "prep time" and not count it.

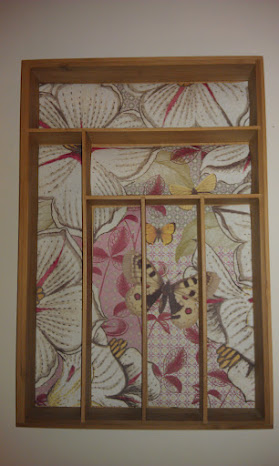
I started out by selecting the paper, what turned out to be the hardest part. You see, my original idea had been to use vintage porcelain furniture knobs to hang the necklaces off of, but I realized that not only were they super bulky, but it would be near impossible to find a pattern that didn't clash horribly with at least one of them. So while I still have those things, I'll use them for something else. Possibly furniture? Anyhow, paper selected!

I wanted something pretty and feminine, but not so loud that the jewelry would clash against it. This seemed to fit the bill! Next came the measuring and cutting, a rather nerve-wracking process. The paper wasn't hugely expensive, but it wasn't cheap, and it was important to me that the pattern of the pieces retain the pattern of the paper. Ergo, no screw-ups allowed! To aid with the process, I did the first cuts on cheap white paper, adjusted the measurements accordingly (its really hard to accurately measure the INSIDE of a box), then traced those pieces onto the nice paper, and cut from there.


I finally had the pieces, and was ready to attach them. Some sites I'd read discussing similar projects suggested using glue sticks. I HATE glue sticks. I really do. I'll admit they're useful for some things, but to me they're annoying, create bubbles, stick weirdly, and are always dried out when you need them most. So I used adhesive spray that I'd bought for another project, but seemed appropriate for this one. As directed, I applied it outside, and let it dry for several hours before bringing it inside. I didn't do a perfect job, but good enough for government work!

Then came another long break. I was in the middle of finals, I was super stressed out, and I just did not have time to sit down and power drill the hell out of this thing. And so the project languished. Until today! Well, I tried to start it back up on Thursday, but then realized I'd neglected to charge the power drill, and so had to wait. Anyhow! Got out my brand-new power drill, a Christmas gift from Mom&Dad, as well as my lovely drill bit set.

I'd already marked where I was supposed to drill, so it was just a matter of creating the holes for the hook & cup and eyelet screws to fit into.

Despite some interruptions from nosy felines-

I eventually managed to get the holes drilled and the screws screwed. Heh.

After that, it was just a matter of selecting the jewelry to be displayed, and placing the container appropriately! Ta Da!!!


Now my necklaces are no longer hidden within a box, I know what earrings I own, and my dresser has become a bastion of delicate femininity. Well. Delicate femininity created with the use of a cordless power drill. The best kind!

Next project: earring display made out of a picture frame. Get excited!

Sunday, May 13, 2012

Infusions of Failure

After the delicious success of blackberry-infused vodka, my Charming Assistant and I became ambitious. Fruit was no longer enough, no. We had to be bold, and daring, recklessly adventurous! And so we decided upon Garlic Habanero Vodka. Spicy, savory, perfect for Bloody Marys, we began this infusion full of confidence.


The recipe we found called for a full bulb of garlic and between four and six Habanero peppers. We decided to go on the light side, figuring we could later add more as needed. Chopping and de-seeding was a delicate business, and I definitely didn't want Habanero oil getting into my eyes or any cuts that I may have. Personal Protective Equipment to the rescue!


Once the ingredients were carefully placed into our handy-dandy Sun Tea jar, it was time for the vodka!


We shook that jar up but good, and placed it into our closet to steep. 8 days later, we were ready to experiment. We put one shot each into two glasses, added tomato juice, lemon juice, Worcestershire sauce, Tabasco, salt, pepper, and ice, and sat down to enjoy some Bloody Marys with breakfast.

Oh boy. That was a mistake. The drinks were so spicy that they burned going down. I powered through about one-fourth of the drink, and became overwhelmed. Charming Assistant and I decided that dilution was required. We poured half of our drinks into new glasses, and added more tomato juice and ice to each. At that point, the drinks were barely consumable. I managed to finish one of my two glasses, but forfeited when confronted with drink number 2.

In retrospect, the disturbing color (kinda like pee, if we're being honest- and I would never lie to you) and the blast of spice and garlic odor should have clued us in to the fact that we'd made the vodka too strong. Alas. But! Charming Assistant and I are nothing if not determined, so we've not discarded the overly-strong alcohol. We're are going to attempt to dilute it with regular vodka, and make more drinks with a 1/4 spicy to 3/4 regular ratio of vodka. I don't know if it'll work, but its worth a shot.

But as a reminder- if you see an article telling you to use FOUR Habanero peppers in a vodka infusion, don't do it. ITS A TRAP!

Saturday, May 5, 2012

Nail Art! Citrus Edition...

One of my weaknesses is nail polish. Even though I can't really grow out my nails, and even though my job destroys a manicure within a week, I still love nail polish. That love got more intense (and more expensive, but never mind that) when I heard about nail art- tiny pictures and designs on nails. And not the super intricate ones from a salon, but cute basic designs you can do yourself. I have to say, the YouTube channel CutePolish has been a huge inspiration in this department. While I don't try all of her designs, and tend to modify those that I do try, she's still the one giving me all these ideas. So, with no further ado, inspired by Cute Polish's citrus nails video, voila:


The polishes are the brands OPI, essie, and Orly. That Orly striper was a miracle find- I didn't even realize they made them, much less sold them at the local makeup store. Previous stripers had to be ordered online! But with easy access to multiple colors of striper, get ready for a hell of a lot more designs!


The first picture is messy, the second blurry (you try taking a picture with your left hand!) but between the two of them you get the gist. So, just in time for this warm spell we're having in DC, I have fun summery nails!

If you're interested in nail art, I really would recommend checking out CutePolish on YouTube, her videos are pretty great. The next post on here will concern our Garlic Habanero Vodka experiment- get excited!

Saturday, April 21, 2012

All the Meat We Could Possibly Eat

A few years ago I was taking a Health & Fitness class to fulfill my school's physical education requirement. And also it seemed more interesting than track. But anyhow! Our instructor was not only an avid exerciser (is that even a word?), but was passionate about eating right. And not just low calorie, but eating right. He emphasized whole foods, cutting down on processed products, and eating ethical meat. He showed us a documentary on factory farmed pigs, and I've never been able to eat pork with quite the same gusto. But when you shop at Giant Food or Safeway, pork that isn't factory farmed is incredibly hard to find. So imagine my delight last week, as we walked past a stall at the farmer's market that sold pork! And imagine our further delight when we found out they offered a "meat CSA"!

For those who don't know, CSA stands for Community-Supported Agriculture. Traditionally, participants in a CSA buy a share of a farmer's crop. Their purchase allows the farmer to cover operating costs, and in return the patrons receive boxes of fresh produce on a weekly basis. It is a win-win situation. Small farms can stay in operation, consumers get to buy local and support local businesses, and the focus is put back onto eating seasonally.

So for this meat CSA, we purchased a share of... well, of their animals I suppose. Our money goes toward feed for the animals and payroll for the humans, and in return we get a box of locally raised, pasture fed meat once a month. Some is fresh, some frozen, and every month we get a variety of cuts of meat from chicken, beef, pork, and lamb. This Saturday was our first pick-up date, so off we went to get out 12 pounds of meat!

The reusable tote bag, full of meat:


North Mountain Pastures' logo:
The meat!
So we have, in order, pork ribs, beef short ribs, pork chops, and lamb shanks. I figured the fresh whole chicken was fairly prominent and didn't need a closeup.

So now the challenge is to find recipes that use these cuts of meat. Luckily, we have this phenomenal tool known as the internet, and I believe it may be of some help in this situation. So far I've located a recipe for stovetop pork ribs, and I have actually roasted a whole chicken before, so that shouldn't be a problem. I have never cooked lamb, so this will be an interesting experiment, but hey- that was part of the reason I wanted to sign up for this- the challenge!

Does anyone have any particular recipes they recommend for these cuts? And are people interested in reading what I do with them? If so, I'll do a collective post, so you won't get spammed with food posts.

We're not eating any of this tonight, as we have plans to go out for oysters. But tomorrow, that chicken is going in the oven, and it is going to be delicious!

Saturday, April 14, 2012

Well that worked out well.

Clearly I was all on top of blogging about my search for the real me, as can be seen by the more-than-two-year gap between posts. Let's start over, shall we? To catch up:

-27 years old
-Living with Charming Assistant in lovely apartment
-Graduating in 1 month
-Have begun the dreaded job search

I'm trying to be more creative in my everyday life, which translates into me taking up knitting and starting various craft projects. Recently Charming Assistant and I decided to experiment with infusing vodka. We decided to start simple, and so began our test with blackberries, the most delicious of the berry families. Yes, strawberries, that includes you too. Maybe you should have been a bit tarter, and you could have had this distinction.

Step 1! Insert blackberries into vodka, like so:


Step 2! Let infuse for one week in refrigerator, then strain and transfer to bottle:


Step 3! Make pretty cocktails, and drink them!


We ended up making the cocktails with the blackberry vodka, the blackberries soaked in vodka, seltzer, and fresh lemon. Everybody liked them, but Charming Assistant and I agreed that they could have been sweeter. Next time I think we'll use a bit more of the vodka, and do half seltzer, half lemonade. But overall, a pretty good first experiment!

Until next time (which will hopefully be before 2014...)